;fill-rule:nonzero;stroke:%23000;stroke-width:48.7px;'/%3e%3cdefs%3e%3clinearGradient%20id='_Linear1'%20x1='0'%20y1='0'%20x2='1'%20y2='0'%20gradientUnits='userSpaceOnUse'%20gradientTransform='matrix(2406.25,-2101.13,2101.13,2406.25,1086.43,2157.14)'%3e%3cstop%20offset='0'%20style='stop-color:%232d1f30;stop-opacity:1'/%3e%3cstop%20offset='1'%20style='stop-color:%239f5060;stop-opacity:1'/%3e%3c/linearGradient%3e%3c/defs%3e%3c/svg%3e)
Connected Kettle: Enclosure
Now that the 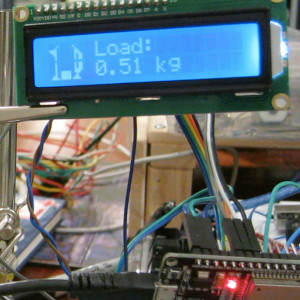 Connected Kettle: Scale and display have been
assembled, it's time to create an enclosure to mount them safely while balancing a kettle above
the scale. Stage 2 of this project is to prototype, print and fit the electronics into a
protective enclosure.
Connected Kettle: Scale and display have been
assembled, it's time to create an enclosure to mount them safely while balancing a kettle above
the scale. Stage 2 of this project is to prototype, print and fit the electronics into a
protective enclosure.
The enclosure needs to:
- Provide a solid base for the kettle, so we can use the kettle's weight to estimate its fill level
- Display the LCD on the front, at an angle that is easy to read from above
- Secure the ESP32 inside and hide wiring related to the components
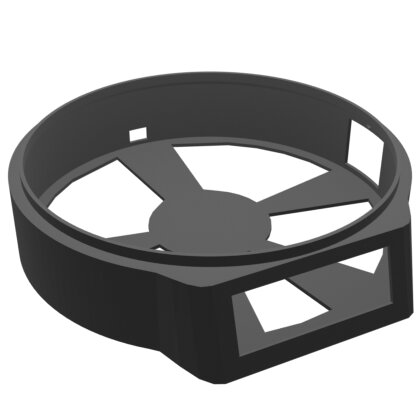
Enclosure body


To cut down on time taken to prototype the enclosure, I "blocked out" sections of the model to be subtracted before exporting the model to the slicer. Non-destructive modifiers like the "boolean" modifier make it easy to prototype changes and variations without needing to undo and revert changes to try new things.
Sizing up the LCD took a few attempts, as I needed to rotate the LCD in to position due to its position near the base of the model. I would have preferred a steeper angle for the LCD, however that would have resulted in needing a larger print area than my printer could support.
The final base shown above has cutouts for the LCD at the front, Micro USB connector at the rear, and an expansion port blocked out on the right-hand side for future connectivity (see Stage 4: handle housing).
Scale top and bottom


The scale top acts as a "tray" to fit the kettle base snugly, and rests all of its weight on the load cell immediately below. Even though the edges of the scale top line up with the enclosure, they don't touch. The scale bottom sits inside the enclosure, providing structural support for the load cell while still leaving space for the wires and ESP32.
To get fast feedback (and save printer filament when prototyping), I cut a diamater-length slice of the scale top to test the kettle base and load-cell top fit.
ESP32 mount

The ESP32 mount was prototyped and printed separately. This made it easier to account for the space that the ESP32 would need inside the enclosure, and the position of the Micro USB port cutout at the rear of the enclosure.
Take-aways
- Prototyping model parts separately and using boolean subtractions is a great way to get fast feedback and save filament.
- Splitting the model into separate pieces makes it easier to get each part working in isolation. Glue and screws are cheap.
Next steps
With the enclosure supporting the kettle and housing the connected components, the connected
kettle
MVP is now complete.
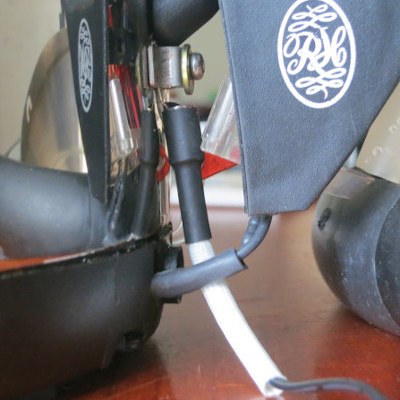 Connected Kettle: Temperature reading adds a thermistor to
the kettle to capture temperature data.
Connected Kettle: Temperature reading adds a thermistor to
the kettle to capture temperature data.
This article is part of the 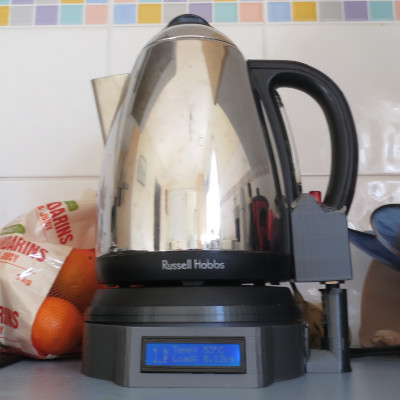 Connected Kettle set.
If you have feedback or questions about this article, let's catch up via email.

 All articles
 About Sinclair Studios