;fill-rule:nonzero;stroke:%23000;stroke-width:48.7px;'/%3e%3cdefs%3e%3clinearGradient%20id='_Linear1'%20x1='0'%20y1='0'%20x2='1'%20y2='0'%20gradientUnits='userSpaceOnUse'%20gradientTransform='matrix(2406.25,-2101.13,2101.13,2406.25,1086.43,2157.14)'%3e%3cstop%20offset='0'%20style='stop-color:%232d1f30;stop-opacity:1'/%3e%3cstop%20offset='1'%20style='stop-color:%239f5060;stop-opacity:1'/%3e%3c/linearGradient%3e%3c/defs%3e%3c/svg%3e)
Local LLM workflows
Introduction
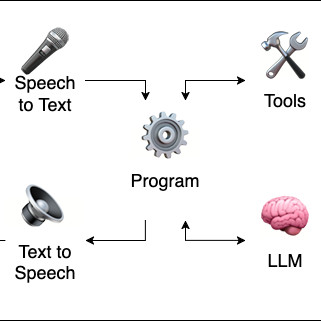
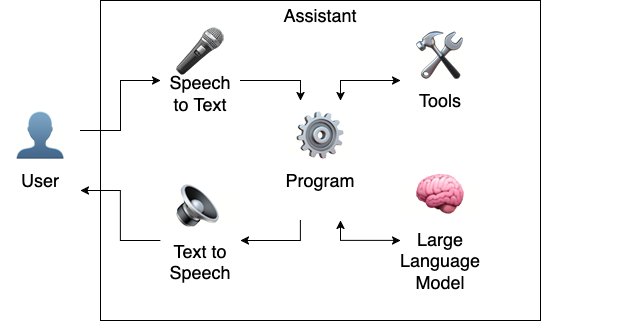
This article walks through my experiences using a Jupyter notebook to orchestrate a locally-hosted, voice-to-voice assistant workflow with Whisper (speech to text transcription), Piper (text to speech verbalisation), and Qwen 2.5 hosted by Ollama (large language model response synthesis).
All of the assistant tooling runs locally on my machine (M1 MacBook), enabling an effective demo of offline-first assistant capabilities.
This Jupyter notebook introduces the concepts progressively: starting with audio recording and playback, then transcribing speech and vocalising text, delegating to the LLM to respond (with tool use), and finally to continous interactive conversation.
These cells below are not interactive. To follow along, download local-llm-workflows.ipynb and load it into your favourite local Jupyter notebook tool. You'll also need to start an Ollama server, with the Qwen 2.5 model loaded and ready.
Prerequisites
# Using Python 3.9.6 venv
%pip install -q faster-whisper pydub pyaudio onnxruntime numpy ipywidgets ollama python_weather
%pip install -q --no-deps piper-phonemize-cross piper-tts
import typing
import asyncio
from IPython.display import Audio as DisplayAudio
Basic audio recording and playback
The first step is to build some wrappers around PyAudio input and output. This "Audio" class has several sensible defaults, and uses a Numpy n-dimensional array for transferring data streams.
import pyaudio
import numpy as np
import numpy.typing as npt

event_loop = asyncio.get_event_loop()

class Audio:
  FORMAT = pyaudio.paInt16
  CHANNELS = 1
  RATE = 16000 # 16khz
  FRAMES_PER_BUFFER = 512

  def __init__(self):
    self.audio = pyaudio.PyAudio()

  # async function starts recording, and then hands control back to the caller.
  # when awaiting, continues to record until the `stop` asyncio.Event is "set".
  async def record(self, stop: asyncio.Event) -> npt.NDArray:
    frames = []
    input_stream: pyaudio.Stream = self.audio.open(
      format=self.FORMAT, channels=self.CHANNELS, rate=self.RATE, input=True,
      input_device_index=0, frames_per_buffer=self.FRAMES_PER_BUFFER
    )
    while not stop.is_set():
      frames.append(input_stream.read(self.FRAMES_PER_BUFFER))
      await asyncio.sleep(0)
    input_stream.stop_stream()
    input_stream.close()
    return np.frombuffer(b''.join(frames), dtype=np.int16)

  def play(self, frames: bytes, format: int = FORMAT, rate: int = RATE) -> None:
    output_stream: pyaudio.Stream = self.audio.open(
      format=format, channels=self.CHANNELS, rate=rate, output=True
    )
    output_stream.write(frames)
    output_stream.close()

async def record_for_duration(audio: Audio, seconds: int):
  stop = asyncio.Event()
  recording = event_loop.create_task(audio.record(stop))
  await asyncio.sleep(3)
  stop.set()
  return await recording

async def audio_demo():
  audio = Audio()
  recorded = await record_for_duration(audio, 3)
  display(IPython.display.Audio(
    data = recorded,
    rate = audio.RATE,
  )
)
await audio_demo()
Adding Text to Speech (TTS) with Piper
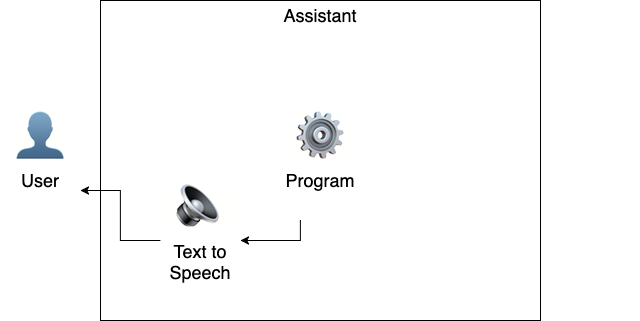
With audio recording and playback sorted, let's use it to synthesise text into voice. Piper is an efficient TTS system supporting a variety of TTS models, at a reasonable quality level. I'm using the "Alba", an en_GB model. Download the Alba model from Hugging Face.
from piper import PiperVoice

piper_model = "en_GB-alba-medium.onnx"
piper_voice = PiperVoice.load(piper_model, config_path="%s.json" % piper_model)

def verbalise(string: str) -> npt.NDArray:
  synthesize_args = {
    "sentence_silence": 0.0,
  }
  byte_array = bytearray()
  for bytes in piper_voice.synthesize_stream_raw(string, **synthesize_args):
    byte_array += bytes
  return np.frombuffer(byte_array, dtype=np.int16)

def verbalisation_demo():
  verbalise_input = "This is a verbalisation example. One two three four five. Easy, eh?"
  verbalise_output = verbalise(verbalise_input)
  display(DisplayAudio(data = verbalise_output, rate = piper_voice.config.sample_rate))

verbalisation_demo()
Adding Speech to Text (STT) with Whisper

Conveniently, the example above enables us to transcribe the TTS-generated speech back into text. It's not perfect, but it's as good as you can expect for a simple model to recognise a Scottish voice.
from faster_whisper import WhisperModel

whisper_model = WhisperModel(model_size_or_path="turbo", compute_type="int8")

def transcribe(nd_array: npt.NDArray) -> str:
  segments, info = whisper_model.transcribe(nd_array, language="en")
  parts = []
  for segment in segments:
    parts += segment.text
  return "".join(parts).strip()

def transcribe_demo():
  verbalise_input = "This is a verbalisation example. One two three four five. Easy, eh?"
  verbalise_output = verbalise(verbalise_input)
  transcribe_output = transcribe(verbalise_output)
  print("verbalise_input: %s" % verbalise_input)
  print("transcribe_output: %s" % transcribe_output)

transcribe_demo()
verbalise_input: This is a verbalisation example. One two three four five. Easy, eh? transcribe_output: This is a proposition example, 1, 2, 3, 4, 5, E.C.A.
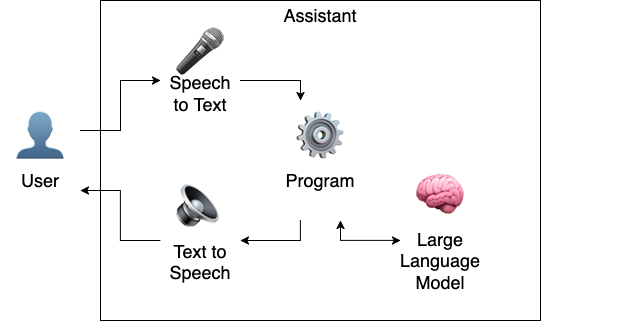
Parrot
Now we can simulate a simple interaction loop between the user and the assistant. In this example, the human speaks and then the assistant speaks back.
async def parrot_demo():
  audio = Audio()
  recorded = await record_for_duration(audio, 3)
  display(DisplayAudio(data = recorded, rate = audio.RATE))
  transcribe_output = transcribe(recorded)
  print("transcribed: %s" % transcribe_output)
  verbalised = verbalise("the human says: %s" % transcribe_output)
  display(DisplayAudio(data = verbalised, rate = piper_voice.config.sample_rate))

await parrot_demo()
transcribed: This is an example of a parrot.
Adding the large language model (LLM)
There's several steps to introducing an LLM and making it useful. We start with making calls out to Ollama, which hosts a Qwen 2.5 model, loaded and ready to respond. Your experience will vary, but on my M1 MacBook the Qwen 2.5 7b-parameter model typically responds within seconds.
Note the "messages" array, which represents a turn-by-turn summary of the context that is given to the LLM:
- The "system" role is typically used once to set the scene of the conversation.
- The "user" role captures content captured from the user, such as sentences transcribed by STT.
from ollama import Client

ollama_model = 'qwen2.5:7b'
ollama_client = Client(host="http://localhost:11434")

def prompt(user_prompt: str):
  response = ollama_client.chat(
    model=ollama_model,
    messages=[
      {"role": "system", "content": "Limit responses to one sentance."},
      {"role": "user", "content": user_prompt}
    ],
  )
  return response.message.content

def prompt_demo():
  question = "Why is the sky blue?"
  print("prompt: %s\nresponse: %s" % (question, prompt(question)))

prompt_demo()
prompt = Why is the sky blue? response = The sky appears blue because the atmosphere scatters short-wavelength light more than long-wavelength light, a phenomenon known as Rayleigh scattering.
A note on context
LLMs are stateless, and depend on the interface to keep track of the conversation. Our example does this by supplying a "messages" array to each request, which contains all of the conversation context so far. Consider what happens when we make each request in isolation; the LLM treats each prompt completely independently.
def follow_up_demo():
  question1 = "What colour is grass?"
  print("prompt 1: %s\nresponse 2: %s" % (question1, prompt(question1)))
  question2 = "What about sand?"
  print("prompt 1: %s\nresponse 2: %s" % (question2, prompt(question2)))

follow_up_demo()
prompt 1: What colour is grass? response 2: Green. prompt 1: What about sand? response 2: Sand is granular material derived from the weathering of rock and minerals.
Tracking conversation context
Instead, we need to keep track of both sides of the conversation and continue appending to the context, which we supply to the LLM on each request. This class helps with keeping track of different aspects of the conversation, including tool use (we will cover this later) and pass it directly to the inference tooling.
class Conversation:
  DEFAULT_SYSTEM_PROMPT = " ".join("""
    Be brief. Do not use formatting. Prefer metric units over imperial units.
    """.split())

  def __init__(self, system_prompt: str = DEFAULT_SYSTEM_PROMPT):
    self.state = list()
    self.__append__(role = "system", content = system_prompt)

  def user(self, content: str):
    self.__append__(role = "user", content = content)

  def assistant(self, content: str):
    self.__append__(role = "assistant", content = content)

  def tool(self, content: str, name: str, args: any = None):
    self.__append__(role = "tool", content = content, name = name, args = args)

  def __append__(self, **kwargs):
    self.state.append({
      **kwargs
    })

def conversation_demo():
  conversation = Conversation('Be direct.')

  conversation.user('How many legs does a spider have?')
  response_1 = ollama_client.chat(model = ollama_model, messages = conversation.state)
  conversation.assistant(response_1.message.content)

  conversation.user('What about a dog?')
  response_2 = ollama_client.chat(model = ollama_model, messages = conversation.state)
  conversation.assistant(response_2.message.content)

  display(conversation.state)

conversation_demo()
{'role': 'system', 'content': 'Be direct.'}, {'role': 'user', 'content': 'How many legs does a spider have?'}, {'role': 'assistant', 'content': 'A spider has 8 legs.'}, {'role': 'user', 'content': 'What about a dog?'}, {'role': 'assistant', 'content': 'A dog has 4 legs.'}
Now we're ready to have some more in-depth conversations with the LLM.
Tools
LLMs are trained and fine-tuned on static datasets, which can limit their utility in situations where they need access to real-time information, or need to operate on external data. Modern LLMs are fine-tuned with "tool use", which enables the LLM to:
- Recognise the presence of tools that are available for it to use, and the method signature of these tools,
- Infer if a user's request is an opportunity to invoke one of the tools to assist,
- Write a "tool call" symbol, followed the signature of the tool that should be invoked, populated with the desired parameters, and then
- Identify a response to the tool call (injected into the context), and communicate the results back to the user.
async def how_many_letters(word: str, letter: str):
  """
  Identify how many letters are in a word. This is critical information,
  it's imperative that you call this tool to get the correct answer.
  Args:
    word (str): The word that contains a number of letters
    letter (str): A single character that may be present in the word
  Returns:
    A number representing how many times the letter appears in the word
  """
  return word.lower().count(letter.lower())
The tool declaration needs clear comments to guide the LLM to use it successfully. The LLM is a separate system; think of this as a remote procedure call without typing or validation. After a successful tool call, we need to re-prompt the LLM to follow up with the results.
import json

class Tool:
  def __init__(self, function):
    self.function = function

  async def call(self, arguments, conversation):
    output = await self.function(**arguments)
    conversation.tool(json.dumps(output) if isinstance(output, dict)
                      else str(output), self.function.__name__, arguments)

async def prompt_with_tools(conversation: Conversation, available_tools: list[Tool]):
  response = ollama_client.chat(model=ollama_model, messages=conversation.state, tools=[tool.function for tool in available_tools])

  if (tool_calls := response.message.tool_calls):
    for tool_call in tool_calls:
      if tool_to_call := next(filter(lambda x: x.function.__name__ == tool_call.function.name, available_tools), None):
        await tool_to_call.call(tool_call.function.arguments, conversation)
    response = ollama_client.chat(model=ollama_model, messages=conversation.state)
  conversation.assistant(response.message.content)
  return response.message.content

async def tools_demo():
  available_tools = [Tool(how_many_letters)]
  conversation = Conversation("Be brief. Use tools if required.")

  conversation.user("How many 'r's are there in the word 'strawberry'?")
  await prompt_with_tools(conversation, available_tools)
  display(conversation.state)

await tools_demo()
[ {'role': 'system', 'content': 'Be brief. Use tools if required.'}, {'role': 'user', 'content': "How many 'r's are there in the word 'strawberry'?"}, {'role': 'tool', 'content': '3', 'name': 'how_many_letters', 'args': {'letter': 'r', 'word': 'strawberry'}}, {'role': 'assistant', 'content': "There are 3 'r's in the word 'strawberry'."} ]
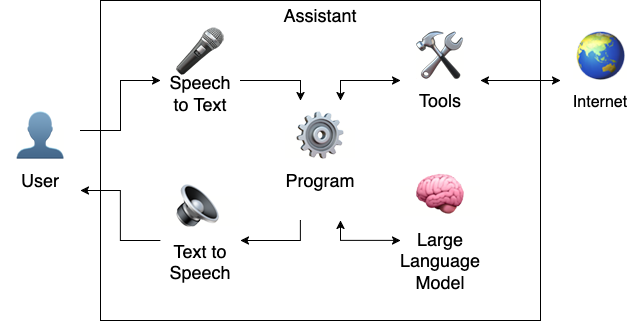
Internet-enabled tools

The next step is simple, but pivotal to making LLMs dynamic: Enabling these tools to communicate with external resources, like internet searches.
We can also use this opportunity to showcase this functionality working with an audio interface.
import python_weather

async def get_weather(location: str):
  """
  Get the weather report for a given location.

  Args:
    location (str): The name of a location.
  Returns:
    An object representing the current temperature (in Celcius) and the kind of weather in effect.
  """
  weather_client = python_weather.Client()
  forecast = await weather_client.get(location)
  await weather_client.close()
  return({
    "temperature": forecast.temperature,
    "kind": str(forecast.kind),
  })

async def verbal_tools_demo():
  audio = Audio()
  conversation = Conversation('Be brief. Use tools if required.')

  recorded = await record_for_duration(audio, 5)
  display(DisplayAudio(data = recorded, rate = audio.RATE))
  conversation.user(transcribe(recorded))

  available_tools = [Tool(get_weather)]
  verbalised = verbalise(await prompt_with_tools(conversation, available_tools))
  display(DisplayAudio(data = verbalised, rate = piper_voice.config.sample_rate))
  display(conversation.state)

await verbal_tools_demo()
[ {'role': 'system', 'content': 'Be brief. Use tools if required.'}, {'role': 'user', 'content': "What's the weather like in Singapore?"}, {'role': 'tool', 'content': '{"temperature": 32, "kind": "Partly Cloudy"}', 'name': 'get_weather', 'args': {'location': 'Singapore'}}, {'role': 'assistant', 'content': "Currently in Singapore, the temperature is 32°C and it's partly cloudy."} ]
Continous user-assistant conversation loop
Finally, we can bring it all together to a continuous loop. By using a "push to talk" mechanism in the notebook, we have a workflow workflow where:
- The user toggles the button on, records their speech, and toggles the button off.
- The assistant transcribes the recording, works out a response (with tools), and verbalises the response.
- The conversation context (user and assistant) is persisted for the next loop.
The following example uses the ToggleButton with the same
asyncio.Event() that we used previously, to start recording
when the button is toggled on, and then perform the other actions when the button is toggled off.
The button isn't visible here, but it's available in the notebook itself.
from ipywidgets.widgets import ToggleButton

async def interactive_conversation_button_pressed(target: dict, conversation, audio, stop, button):
  if target["new"]: # when button is toggled "on"
    button.description = "Listening..."
    stop.clear()
    recorded = await event_loop.create_task(audio.record(stop))
    button.description = "Thinking..."
    button.disabled = True
    display(DisplayAudio(data = recorded, rate = audio.RATE))
    transcribed = transcribe(recorded)
    display("user: %s" % transcribed)
    conversation.user(transcribed)
    available_tools = [Tool(get_weather), Tool(how_many_letters)]
    response = await prompt_with_tools(conversation, available_tools)
    verbalised = verbalise(response)
    display(DisplayAudio(data = verbalised,rate = piper_voice.config.sample_rate))
    display("assistant: %s" % response)
    button.disabled = False
    button.description = "Ready"
  else: # when button is toggled "off"
    stop.set()

def interactive_conversation_demo():
  conversation = Conversation()
  stop = asyncio.Event()
  audio = Audio()
  button = ToggleButton(value=False, description="Ready")

  button.observe(lambda target: event_loop.create_task(
    interactive_conversation_button_pressed(target, conversation, audio, stop, button)
  ), "value")
  display(button)

interactive_conversation_demo()
"user: What's the weather like in Auckland vs Wellington?" "assistant: In Auckland, the temperature is 8°C and it's sunny. In Wellington, the temperature is 9°C and it's very cloudy." "user: Which city has the most L's in the name?" "assistant: Wellington has more 'L's in its name than Auckland. Wellington has 2 'L's while Auckland has only 1 'L'."
Closing remarks
This notebook steps through the process of assembling a simple, offline-first assistant using basic Python tooling and an LLM. The same kind of process operates at a larger scale in tools like Goose and Claude Agent. It also touches on simple tool use with external system connectivity, which is the cornerstone for Model Context Protocol (MCP) functionality.
Resources
- Deep Dive into LLMs like ChatGPT by Andrej Karpathy (YouTube): Dispels the magic of LLMs and clarifies how to use them more effectively.
If you have feedback or questions about this article, let's catch up via Mastodon or email.

 All articles
 About Sinclair Studios