;fill-rule:nonzero;stroke:%23000;stroke-width:48.7px;'/%3e%3cdefs%3e%3clinearGradient%20id='_Linear1'%20x1='0'%20y1='0'%20x2='1'%20y2='0'%20gradientUnits='userSpaceOnUse'%20gradientTransform='matrix(2406.25,-2101.13,2101.13,2406.25,1086.43,2157.14)'%3e%3cstop%20offset='0'%20style='stop-color:%232d1f30;stop-opacity:1'/%3e%3cstop%20offset='1'%20style='stop-color:%239f5060;stop-opacity:1'/%3e%3c/linearGradient%3e%3c/defs%3e%3c/svg%3e)
Media center remote: Television integration
With the Media center remote now supporting a basic
Media center remote: Kodi integration via webservice calls,
the next step is to expand it to send RS-232 control codes to a connected television.
The goals of this stage are to:
- Use a UART integration to transmit to a connected television over RS-232.
- Send different UART codes depending on the incoming infrared signal received.
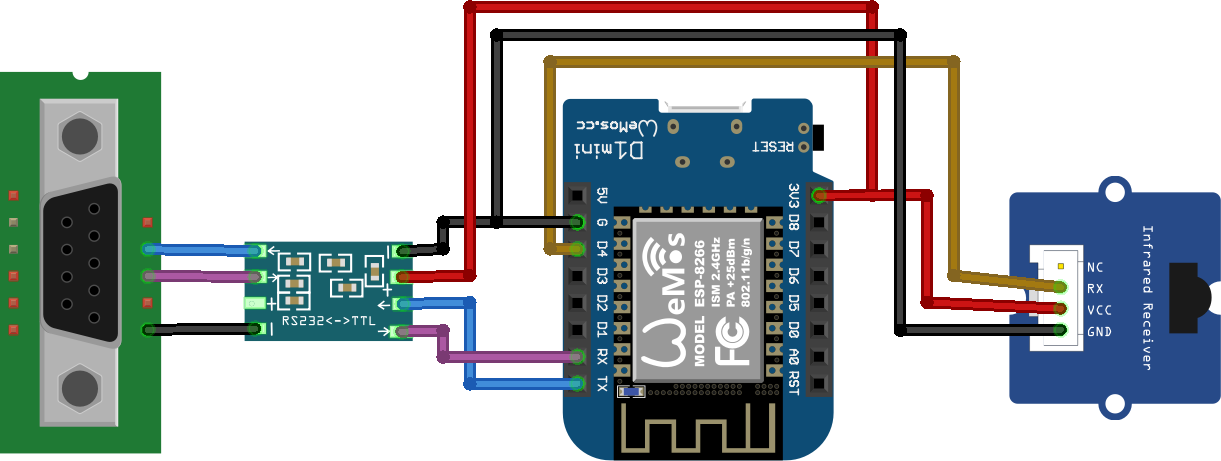
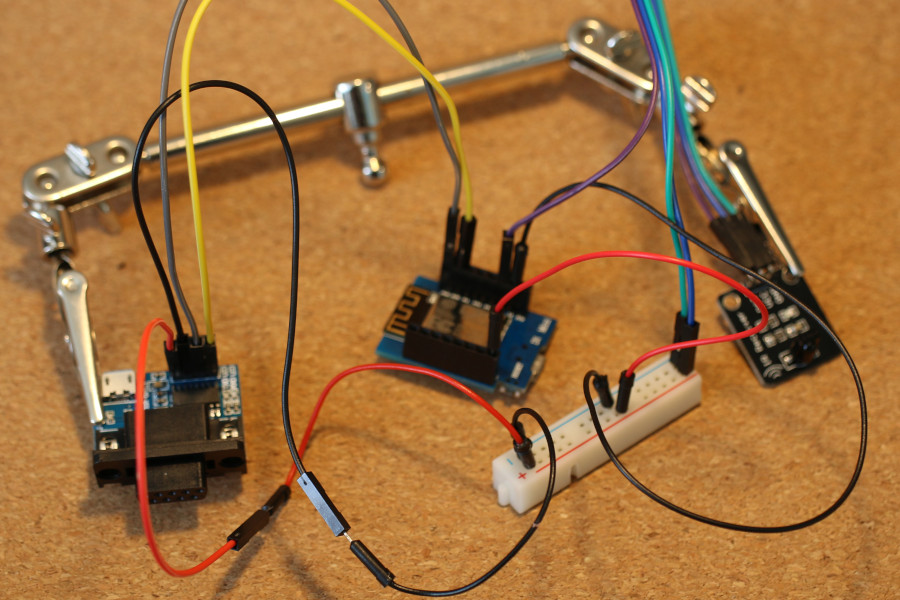
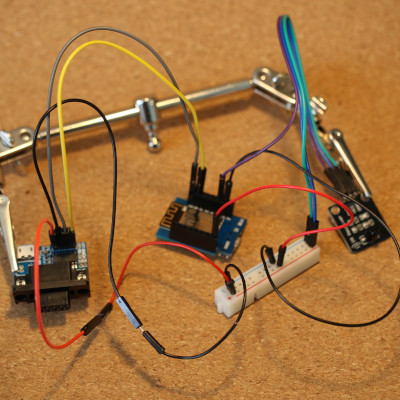
A subtle but important note is that the RS-232 module is connected to the ESP8266 in "crossover" mode, to simulate a null-modem cable connection.
Television UART codes
I'm using an older LG plasma TV, but the control codes found in the LG UV340C instruction manual appear to work on mine. A few codes stand out as being more useful for remote controller:
ka 0 00- Turn the television on
ka 0 01- Turn the television off
xb 0 90- Set the input to HDMI 1
xb 0 91- Set the input to HDMI 2
ESPHome configuration
Highlighting the differences from before, this configuration:
- Runs an automation when an "lg" infrared signal is received that updates a "command_for_television" sensor to track the command to be sent to the television
- Runs an automation when the "command_for_television" is updated, which sends a UART code to the television.
media-center-remote.yaml
# ...

uart:
  tx_pin: GPIO1
  rx_pin: GPIO3
  baud_rate: 9600

text_sensor:
# ...
- platform: template
  id: command_for_television
  internal: true # Do not expose to Home Assistant
  on_value:
    # Take the value of command_for_television, convert it to a vector and append a \r (carriage return).
    - uart.write: !lambda |-
        std::vector<uint8_t> command = std::vector<uint8_t>(x.begin(), x.end());
        command.push_back('\r');
        return command;

switch:
  # Allow the television to be switched on and off via Home Assistant
  - platform: template
    name: "Television"
    id: television_on
    icon: mdi:power
    optimistic: true
    on_turn_on:
      text_sensor.template.publish:
        id: command_for_television
        state: "ka 0 01"
    on_turn_off:
      text_sensor.template.publish:
        id: command_for_television
        state: "ka 0 00"

number:
  # Allow the television HDMI input to be changed via Home Assistant
  - platform: template
    name: "Television HDMI input"
    id: television_hdmi_input
    icon: mdi:video-input-hdmi
    optimistic: true
    min_value: 1
    max_value: 4
    step: 1
    on_value:
      - lambda: |-
          switch((int) x) {
            case 1:
              id(command_for_television).publish_state("xb 0 90");
              break;
            case 2:
              id(command_for_television).publish_state("xb 0 91");
              break;
            case 3:
              id(command_for_television).publish_state("xb 0 92");
              break;
            case 4:
              id(command_for_television).publish_state("xb 0 93");
              break;
          }

remote_receiver:
  # ...
  on_lg:
  # In this lambda, x is an LGData. x.data is a uint32_t that identifies the signal pressed.
  - lambda: |-
      switch (x.data) {
        // ...
        case 0x00FF38C7: // 16
          id(television_hdmi_input).publish_state(1);
          break;
        case 0x00FF5AA5: // 17
          id(television_hdmi_input).publish_state(2);
          break;
        // ...
        case 0x00FF4AB5: // 19
          id(television_on).publish_state(false);
          break;
        case 0x00FF52AD: // 20
          id(television_on).publish_state(true);
          break;
        // ...
        }
Log output
Powering up the device and pressing buttons on the remote controller yields logs similar to the following:
...
[17:28:27][D][number:036]: 'Television HDMI input': Sending state 1.000000
[17:28:27][D][text_sensor:015]: 'command_for_television': Sending state 'xb 0 90'
[17:28:35][D][number:036]: 'Television HDMI input': Sending state 2.000000
[17:28:35][D][text_sensor:015]: 'command_for_television': Sending state 'xb 0 91'
[17:28:38][D][switch:045]: 'Television': Sending state OFF
[17:28:38][D][text_sensor:015]: 'command_for_television': Sending state 'ka 0 00'
[17:28:43][D][switch:045]: 'Television': Sending state ON
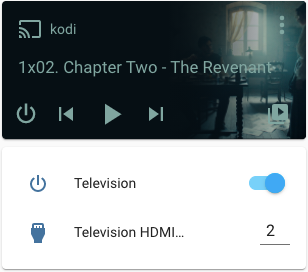
[17:28:43][D][text_sensor:015]: 'command_for_television': Sending state 'ka 0 01'Home Assistant integration
Using the intermediary switch and
number components in the configuration allows the values to be
updated remotely, such as via Home Assistant. The media center remote device exposes these two
template sensors as controllable entities.
Next steps
Controlling Kodi is good, but we can go one step further and control the television in Stage 3:
Media center remote: Television integration.
This article is part of the Media center remote set.
If you have feedback or questions about this article, let's catch up via email.

 All articles
 About Sinclair Studios