;fill-rule:nonzero;stroke:%23000;stroke-width:48.7px;'/%3e%3cdefs%3e%3clinearGradient%20id='_Linear1'%20x1='0'%20y1='0'%20x2='1'%20y2='0'%20gradientUnits='userSpaceOnUse'%20gradientTransform='matrix(2406.25,-2101.13,2101.13,2406.25,1086.43,2157.14)'%3e%3cstop%20offset='0'%20style='stop-color:%232d1f30;stop-opacity:1'/%3e%3cstop%20offset='1'%20style='stop-color:%239f5060;stop-opacity:1'/%3e%3c/linearGradient%3e%3c/defs%3e%3c/svg%3e)
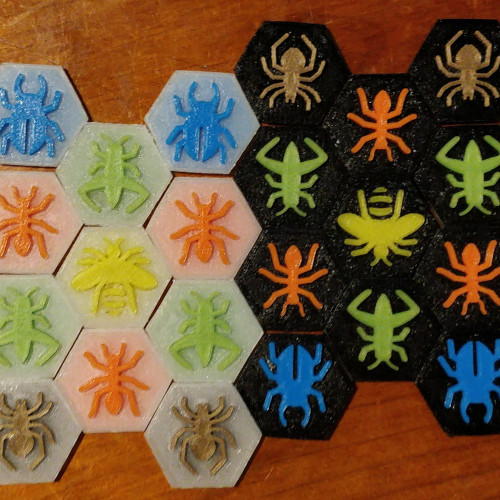
Touchy Bugs
Touchy Bugs is a set of 3D printable alternative tiles for Hive, a two-player strategy game. This project is an experiment in building workflow for designing, building, slicing and printing game pieces.
Check out the project on GitHub and Thingiverse.

Workflow
With the help of a Makefile, it was possible to automate the workflow as follows:

Designing tile and insert shapes in OpenSCAD
Creating hexagonal cylinders in OpenSCAD is pretty straightforward; just create a cylinder with six sides. The tile is designed to be the "outer" part, while the insert is the "inner" part.


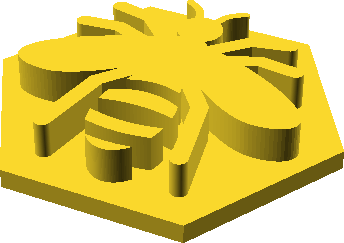
Tile
difference() {
  cylinder($fn=6, center=true, d=30, h=3);

  translate([0, 0, 0.5])
    cylinder($fn=6, center=true, d=28, h=2);
}
Insert
cylinder($fn=6, center=true, d=27.5, h=1.5);
Drawing bug silhouettes in Inkscape
Inkscape's line drawing tools make it pretty straightforward to draw bug silhouettes. I chose some constraints to make the bug designs consistent:
- Reflectionally symmetrical: The bug's left side is a mirror image of the right side.
- Simple features: Remove details that aren't neccesary for the bug to be recognisable.
- Full shapes only: The bug does not have any hollow areas.
- Consistent leg and antenna width: To keep the bugs the same size, and reduce the risk of printing defects.


Building tiles and inserts with OpenSCAD
The first automatable step uses Make to run paramaterised OpenSCAD builds and exports via the command line interface. For each bug, we want to:
- Load the bug shape into the insert design and combine it with the existing shape
- Load the bug shape into the tile design and use it to cut through the existing shape

Tile
// `tile` is a command-line variable

difference() {
  cylinder($fn=6, center=true, d=30, h=3);

  translate([0, 0, 0.5])
    cylinder($fn=6, center=true, d=28, h=2);

  translate([0, 0, -2])
    linear_extrude(height = 2)
      import(str(tile, ".svg"), dpi=800, center=true);
}
Insert
// `insert` is a command-line variable

cylinder($fn=6, center=true, d=27.5, h=1.5);

  translate([0, 0, 0.75])
    linear_extrude(height = 2.75)
      import(str(insert, ".svg"), dpi=800, center=true);
Makefile
(with BUG set as an environment variable)
build:
  openscad -o $BUG-insert.stl -D ''insert=\"$BUG-insert\"'' insert.scad
  openscad -o $BUG-tile.stl -D ''tile=\"$BUG-tile\"'' tile.scad
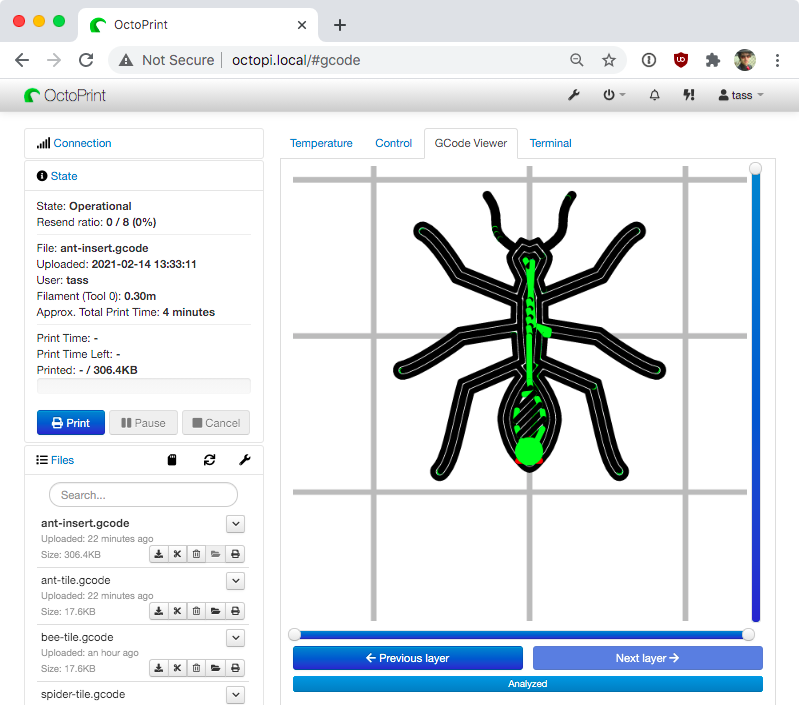
Slicing tiles and inserts with Cura Engine
Cura Engine is the slicing engine used by Cura and other 3D printing workflow tools. Its command-line interface makes it easy to automate the process of slicing the built objects into G-code.
Cura Engine is included as part of a normal Cura installation, meaning that we don't need to go out of our way to install it manually. However, supplying build parameters is a little confusing. I ended up needing to:
-
Digging through the cura log (
~/Library/ApplicationSupport/cura/4.6/cura.log) to find the lines tagged withUM.Backend.Backend._backendLog. - Copying the command line options to a separate file for convenience.
- Running CuraEngine to slice the STL model, with the command line options loaded from the file.
Makefile
(with BUG set as an environment variable)
slice:
  /Applications/Ultimaker\ Cura.app/Contents/MacOS/CuraEngine slice \
    $(shell cat cura-options.txt) \
    -l $BUG-insert.stl -o $BUG-insert.gcode
  /Applications/Ultimaker\ Cura.app/Contents/MacOS/CuraEngine slice \
    $(shell cat cura-options.txt) \
    -l $BUG-tile.stl -o $BUG-tile.gcode
Enqueuing for printing with OctoPrint
After slicing the G-code, the print is ready to sent to Ocroprint for printing. This step uses the Octoprint API to upload the gcode to an Octoprint instance and select it, so all we need to do is navigate to the Ocroprint UI, review the gcode, and press "print".
Makefile
(with BUG and OCTOPRINT_API_KEY set as
environment variables)
enqueue:
  curl --request POST \
    --url 'http://octopi.local/api/files/local' \
    --header 'Content-Type: multipart/form-data' \
    --header 'X-Api-Key: ${OCTOPRINT_API_KEY}' \
    --header 'content-type: multipart/form-data; boundary=---011000010111000001101001' \
    --form file="@$BUG-insert.gcode" \
    --form select=true \
    --form print=false | jq -r ".files.local.refs.resource"
  curl --request POST \
    --url 'http://octopi.local/api/files/local' \
    --header 'Content-Type: multipart/form-data' \
    --header 'X-Api-Key: ${OCTOPRINT_API_KEY}' \
    --header 'content-type: multipart/form-data; boundary=---011000010111000001101001' \
    --form file="@$BUG-tile.gcode" \
    --form select=true \
    --form print=false | jq -r ".files.local.refs.resource"
Future work
This project was a good proof of concept that design, slice and print steps can be automated, but it's not yet mature enough to work as a real delivery pipeline. Some ideas to extend this further:
-
Implement "versioning" the built, sliced and printed artefacts.
- Versioning files is easy, just bump a number and and append it to the filename.
- Versioning printed pieces is possible by using OpenSCAD to imprint a version number onto the game pieces.
- Introducing quality gates (automated or manual) to stop the pipeline early if something goes wrong with the building or slicing.
- Using a printer that supports continuous printing without clearing the build plate, such as Naomi Wu's 3dPrintMill.
If you have feedback or questions about this article, let's catch up via email.

 All articles
 About Sinclair Studios